Showing posts with label quick fix. Show all posts

Friday, January 23, 2015

Secret Weapon Southern-Style Philly Cheese-steaks


I'm a huge fan of Philly cheese-steaks, and I know that my homemade version doesn't hold a candle to the real deal up North, but this is just my simple, Southern rendition of a cheese-steak sandwich. Hold on to your britches, it's super simple, and the bold flavor is beyond yummy.

1 box of sirloin break-away style patties
1 big ol' scoop of frozen fajita style peppers and onions
1 generous spoonful of minced garlic
* 2 tsp. bbq sauce
* 2 tsp. Worcestershire sauce
* 2 tsp. A1 steak sauce
hoagie or hot dog buns
sliced provolone cheese


Cook the beef patties until about half done then add the frozen peppers and onions. We were out of mushrooms, but they would be equally delicious if added - it's completely up to you. Once the onions and peppers have cooked up nicely, add the garlic and sauces - this is the secret weapon part. You can add more or less if you like, but this combination gives a bold and saucy kick. Allow to simmer for 4-5 minutes.


Spoon into buns, top with cheese, and toss in a hot oven for 3-4 minutes or until cheese is melty.


Looking for Superbowl food ideas? Consider using mini hot dog buns or slider style burgers for the ultimate game-day snack! You can't go wrong with this one, y'all. Enjoy.

Thursday, January 22, 2015

Creamy Italian Bell Pepper Chicken


I threw this meal together last night, and it was a hit at the Bohannon house. I had all the ingredients on hand, and I knew if we didn't eat those bell peppers in the fridge, they would go bad.
 

Ingredients:

2 medium bell peppers, chopped

2-3 large chicken breasts - sliced

1 jar of Alfredo cream sauce

1 heaping spoonful of minced garlic

White wine of choice - I used about 1/4 - 1/3 c.

Pasta of choice (I used penne)

Italian seasoning

salt (optional)


Start by grilling your chicken slices. (I used coconut oil since this dish has a slightly sweeter flavor.) Add the minced garlic & a dash of Italian seasoning when the chicken is about half way done. Reduce heat to medium-low.


Add wine and peppers when chicken is almost done. Let simmer for about 3-4 minutes before adding the cream sauce. Stir well and allow to sit for about 5 minutes before serving over penne pasta. Garnish with chopped provolone cheese and Italian seasoning.


I love garlic bread, and my favorite way to fix it is by cooking refrigerated crescents flat. No need to separate or press together. Just bake until golden brown which is only about 6-7 minutes.

 
Slather with butter and top with garlic salt = perfection.


This dish was incredibly easy to fix and didn't take a significant amount of time or energy. Not to mention the flavor was spot on. Enjoy!


Friday, January 9, 2015

Reese's Rolls Recipe

Some mom friends of mine recently introduced me to a great website called Influenster. This site is designed to allow consumers to write helpful product reviews, research potential purchases, and earn member-only discounts and perks.

In addition, Influenster frequently sends free products to their users. Their VoxBoxes contain anything from beauty products and personal supplies to cooking ingredients and snacks.


I was recently chosen to sample and review a new product, Reese's Spreads. If you like these:


Then Reese's Spread is something you need in your pantry....today!


This super-smooth, velvety concoction of chocolatey-peanutbuttery goodness is incredibly delicious. It can be paired with snacks like apple slices or pretzels, but personally,
I prefer simply pairing it with a spoon. Yum.

Last night, I created a delicious desert for my family with my free container of Reese's spread and just two other ingredients: refrigerated crescent rolls and powdered sugar. It was quick, easy, and incredibly yummy! Here's how I made it:


How will you use your Reese's spreads?

Wednesday, May 14, 2014

Whip out the Waffle Iron

Even though I'm currently trying to watch what I eat, I am excited to share with you busy folks the glorious waffle iron. Talk about quick fixing. This machine is amazing when it comes to creating delicious meal accessories (that are usually laden with carbohydrates, but incredible nonetheless).

Here are a few of my favorite contents to cook up with the waffle iron. Once that sucker is heated up, it only takes a couple of minutes until your product is finished.

1. cornbread - I typically buy the bag mix that requires only a few additional ingredients, but cornbread waffles are spectacular with chili or soup!

2. muffin mix - again, bag mix + milk is the way to go

3. cake mix - this time, I go for the boxed kind (shocking, I know)

4. shredded hash-browns

5. canned cinnamon rolls

6. canned biscuits

7. cookie dough (works best when 'partially' frozen)

8. brownie mix

Am I leaving anything out? What is your favorite thing to fix in the waffle iron?

Tuesday, May 13, 2014

Creamy Cajun Chicken & Shrimp

So I made another really delicious meal for my family last night, and shhhhhh, I'm actually on a diet. So, here is a little sumthin sumthin to make your taste buds do a dance. AND the best part, it's balanced and doesn't break the bank in calories. Here goes.

Ingredients
1 jar LITE alfredo sauce (half the calories and fat of traditional!)
3 oz. shrimp per eater (because that is a serving size)
1 chicken sausage per eater (I used Savory Kitchen brand Bacon & Cheddar flavored sausages from Sam's Club - they are only 120 calories each - not too shabby since they are incredible) *sliced*
1 small zucchini chopped chunky
1 small yellow squash chopped chunky
1 yellow bell pepper chopped chunky
1 small-med. onion chopped chunky
heaping spoonful of minced garlic
cajun seasoning


I started off by grilling the veggies until they are golden, but still crunchy. Remove from pan and toss in your sausage slices. Once those are browned, throw in the shrimp. Stir for about a minute and return the cooked veggies to the pan. Pour in the sauce, garlic, and any extra seasoning you prefer to taste. I used a good amount of wedding spice in addition to the Cajun, but it's mostly Cajun seasoning anyways. Stir and simmer on low for about five minutes - or until your shrimp are completely pink.

I served mine with rice and red beans - it was phenomenal AND healthy. Boom shakalaka. Oh and it only took about 30-35 minutes to prep and make this entire meal.

If you are trying to eat healthier, the bulk of this dish is veggies and substituting the lighter version of the sauce is a much wiser choice. You could also go as far to serve with brown rice instead of white but that's all we had in the cabinet.

Enjoy y'all!

Thursday, May 8, 2014

Stromboli - Busy Mom Styled

I really enjoy cooking Stromboli. I feel like this is one of those recipes that is time consuming the first try, but after that, it's one that is incredibly easy and equally delicious.

Ingredients:

1 canned pizza crust (or you can use the quick mix kind, or you can make your own)
~8 slices of provolone cheese
~8 slices of ham
sliced pepperoni
Optional: grilled veggies (onions, mushrooms, peppers, zucchini, etc - whichever you prefer)
Optional: additional grilled meat like beef or chicken

Arrange your pizza crust on a greased baking sheet; press the corners out and flatten the dough so you will have enough to fold over and create a roll once the fillers are added. Arrange 1/2 the ham, provolone & pepperoni in the center of the dough, leaving 1/3 free to the left and right. Top with optional veggies & grilled meat. Finish layering the remaining ham, pepperoni and cheese on top of the veggies. Fold both sides of the dough over the center to create your Stromboli log. (you can brush the roll with oil before baking, but I never do)

Bake at 375 until the crust is golden brown and crispy - usually about 15 minutes for me, but cooking time will vary. Slice and serve with marinara sauce for dipping.

Note: I do not like to roll the dough so that there is breading in the center of the stromboli log - that middle portion never cooks quite right for me, leaving the exterior either burnt, or the interior a soggy mess of uncooked dough. Limit the breading to the exterior of your filling to avoid any inconsistencies in the baking.


Omelets, Omelets, We've Got Your Omelets

I am almost ashamed to admit that I really suck at making omelets, BUT I have a few tips and tricks to share with you about making these breakfast delights.

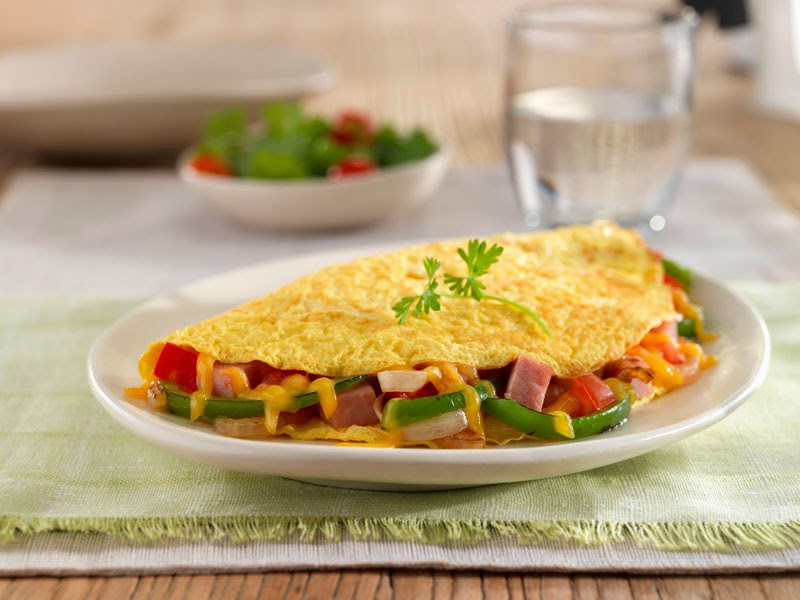
Most people think of omelets that look a little something like this:

eggbeaters.com
 
Personally, I prefer the messy omelet, or groundhog version, where everything is just mixed all together and thrown in the pan. They don't call me Rebel Chef Mom for nothing. For the sake of visual clarity, my omelets usually turn out something like this:

http://behealthybehappywellness.com

Regardless if you like the pretentious perfection of a beautifully flipped, perfectly folded, symmetric egg pocket of fillers, or simply toss everything in a pan and stir, here are some tips and ideas that I find helpful for this meal of breakfast perfection.

1. Add about 1/8th of a cup of milk and about 2 tablespoons of pancake mix or general purpose baking mix to your scrambled eggs before cooking. Whip with a fork or spatula for the ultimate fluff factor to your eggs. The mix powder helps the eggs to stick together and really make the art of flipping and folding much easier.

2. Keep the temperature down - low to low/medium heat is idea for cooking eggs. If you turn the burner on too hot, you'll brown your eggs.

3. My sister-in-law introduced me to the concept of Ziplock omelets, and although we don't do this often, I think it's a great idea for families that have different preferences on omelet ingredients, and especially at larger gatherings.
 
So, here's the catch. Apparently some super chemical conscious folks don't think that boiling plastic bags is very safe. I'm a Rebel Chef Mom, so honestly, I don't think twice, but just in case you have second thoughts about boiling, Ziplock company does have instructions for how to make a Ziplock omelet in the microwave. Personally, if I'm going to microwave eggs, I'll just pour them in a microwave safe dish, but whatever. The bags make it easy to clean up, and everyone can prep their omelet just the way they like it.

If you decide to boil your omelet bags, I suggest keeping an eye on your product. If the pot gets too hot, the top of the bags that are not submersed in the water can droop over and rest against the side of the pot. This could potentially melt your bag and cause your contents to seep out into the boiling water. Use tongs to keep the tops of the bags held upright until the omelets are completely cooked.

Especially for moms of picky eaters - I have successfully incorporated steamed cauliflower puree into scrambled eggs. The finished product is somewhat thinner in texture, but the cauliflower adds a buttery sweetness to the eggs which I personally think is really delicious. Check out Jessica Seinfield's book Deceptively Delicious if you want more ideas for how to sneak healthy veggies into popular foods that kids love.

Shopping For Quick Fix Meals

One of the ways that I can efficiently create quick meals is by spending a few extra dollars at the grocery store to buy pre-prepped food items. I know it's more expensive, but honestly, a few extra bucks in the grand scheme of my food bill is totally worth the time that it saves me at home.

Chopping veggies, peeling, cutting, de-coring, de-seeding....ugh. No thank you. So here are some of my favorite quick fix assistants that greatly speed up the time I spend in the kitchen.

1. Pre sliced apples
Not only are these great for snacking, but I can make some spectacular faux baked apples in less than 10 minutes. I also enjoy using them as an extra in a variety of pork dishes as well as on salads.

2. Refrigerated pizza crust
This canned delicacy is fantastic for making homemade pizza and one of our household favorites, Stromboli. It can also be cut down to make a fantastic crust for chicken pie. Having a can of pizza crust on hand is one of those items that makes a last minute meal decision much easier.

3. Frozen veggies
Bird's eye, store brand, Green Giant - you name it. I don't discriminate. Frozen veggies are incredibly quick and nutritious.

In particular, Schwanns makes a great bag of prepped peppers and onions that can literally be used in SO many different recipes: Philly cheese steaks, omelets, spaghetti sauce, etc. These bad boys come chunky diced - perfect size in my opinion, and I can just grab a handful and toss them into whatever I'm cooking.

4. Canned pasta sauce
Nothing compares to a from scratch marinara sauce, but have fun with the umteenmillion prep steps. I'll stick to my glass jars and save a tremendous amount of time instead. Remember, you can always doctor up your canned sauce with additional spices and vegetables.

5. Canned, diced tomatoes
I buy them by the case.

6. Fresh, minced garlic
I use this stuff by the spoonful, so not having to chop it up is incredible.


There are many more ingredients that I typically buy in some sort of pre-prepped fashion. I highly recommend choosing this route if your ultimate goal is to save time in the kitchen. What are your must-have, tried and true pre-prepped items that help you? I'd love to hear your suggestions.

xoxo,
Rebel Chef Mom

Spicy Honey Garlic Lime Chicken

I'll admit, I threw together a delicious chicken marinade the other night, and honestly, it's probably one of my favorites that I've ever made - especially on a whim, without much inspiration from somebody else. Here are the ingredients for the marinade:


Juice of 2 limes (after squeezing, I let the squished lime halves sit with the remainder of the mix)
~1/2 to 3/4c of a lime based beverage (I used Budlight's Lime-arita, but you could really use anything that you wanted to to add some liquid volume to your marinade)
1 heaping spoonful of minced garlic (the fresh kind, not powder)
~1/4 c. honey
a few pinches of your favorite seasoning


That last bit is where you can get creative. I prefer to use a house seasoning mix that I created a few years ago. I'll share that combination in a later post, but for now, just get a little crazy. Chili powder, spicy pepper, seasoning salt - all of those are great additions to this marinade. After all, when you're only using a few pinches, it's really just to give your marinade some saltiness and kick. If you want to play it safe, stick with just plain ol' salt and pepper.

I chose to marinade some chicken breast tenderloins because they thaw quickly.

After grilling, I served with white rice (big fan of the 5-minute, instant variety myself) and this Southwestern Black Bean Medley:

1 can black beans (drain ~1/2 the liquid off)
1 can diced tomatoes (drain ~1/2 the liquid off as well)
2 large zucchini sliced
1 med-large onion (chunky diced)
small spoonful of minced garlic
few pinches of southwestern seasoning (I used the Tastefully Simple brand for this one)

Toss all this stuff in a pot and simmer on medium (covered) while you cook your chicken. Stir often to prevent the beans from sticking.


This combination of dishes also makes a spectacular burrito. Throw in some mango salsa, shredded cheese, & sour cream (or plain Greek yogurt) and enjoy!


Once your chicken has marinaded for about an hour, this meal only takes about 20 minutes to cook. Basically the order of operations for the most efficient cooking time = prep marinade while chicken is thawing. While chicken is marinading, cut up veggies. While cooking chicken, cook rice & bean medley.

For an even more efficient cooking experience, toss the marinade and the frozen chicken in a bag so it marinades while it thaws. This can be done ahead of time. In fact, you can freeze the marinade with the chicken.

Wednesday, May 7, 2014

Ranch Gravy Pork + Roasted Baby Carrots + Faux Baked Apples

On a whim, I came up with this meal, and in my opinion, it was stellar. It was fast, easy, and delicious, so here you go:


Start out by pre-heating your oven to ~400 degrees F.

Arrange baby carrots on a baking sheet. Spray or drizzle with oil of your choice. Pop those bad boys in the oven when it's up to temperature. I let mine cook for about 20 minutes - I never set a timer, so just check often and use your judgement. You might want to stir/flip half way through the baking process depending on your oven.

When tender or cooked to your liking, toss with your favorite veggie seasoning. I use a very simple combination of cajun seasoning + brown sugar + garlic salt.


Next

Prepare your apples or go the quick route with a bag of the pre-sliced variety. I cook with the peels on, so the plastic container of apple slices from Sams Club is a staple in our household. It's all a matter of preference.

Dump your slices into a microwave safe dish - I'm a huge fan of the Pampered Chef Cranberry Baker. Toss in a spoonful of butter or margarine, cover, and cook for 6 minutes on high. Sprinkle with brown sugar, drizzle with a heavy portion of honey, stir, and cook for another 2-3 minutes. Let sit while the remainder of the food is finishing up.


Ranch Gravy Pork Chops

Ingredients:
boneless pork chops
equal parts plain Greek yogurt + sour cream
ranch powder seasoning stuff (comes in those little packets)
milk or water for thinning (I used a few tablespoons)

Grill your pork chops on medium/high until they are ~half done. I flipped once so both sides were equally cooked & used a lid. Turn temperature down to low.

Mix everything else together in a bowl and spoon HALF of that mixture on top of the chops. Let simmer for a minute, flip and spoon the rest of your saucy stuff on top. Half of your ranch mix will naturally mingle with the juices from your pork chops to create this creamy, rancy, succulent sauce. Cover and let simmer until chops are cooked through.


All in all this meal took me no more than 30 minutes to prepare - carrots & apples were already prepped & the sauce was simple to mix up in just a minute. I'm patting myself on the back for a job well done with this meal. Yum.